


Table of contents
- What is Git and why is it important?
- Name a few Git commands with their function.
- What is the difference Between Main Branch and Master Branch??
- Can you explain the difference between Git and GitHub?
- What does the git push command do?
- How do you create a new repository on GitHub?
- What is the difference between local & remote repositories? How to connect local to remote?
- Practical:
You can refer Basic Git & GitHub for DevOps Engineers.
What is Git and why is it important?
Git is a version control system for tracking changes in computer files and coordinating work on those files among multiple people.
It is primarily used for source code management in software development but it can be used to keep track of changes in any set of files.
As a distributed revision control system, it is aimed at speed, data integrity, and support for distributed non-linear workflows.
By far, the most widely used modern version control system in the world today is Git. Git is a mature, actively maintained open-source project originally developed in 2005 by Linus Torvald. Git is an example of a Distributed Version Control System, In Git, every developer's working copy of the code is also a repository that can contain the full history of all changes.
Name a few Git commands with their function.
Git config - Configure the username and email address
Git add - Add one or more files to the staging area
Git diff - View the changes made to the file
Git init - Initialize an empty Git repository
Git commit - Commit changes to the head but not to the remote repository
What is the difference Between Main Branch and Master Branch??
A branch is essentially a unique set of code changes with a unique name. Each repository can have one or more branches. The main branch — the one where all changes eventually get merged back into is called master.
The master branch is no different than any other branch in a cloned Git repo, except that historically it's been the default name used when the first branch is created
Can you explain the difference between Git and GitHub?
Git is a distributed version control system (DVCS) that allows multiple developers to collaborate on a project efficiently. It keeps track of changes made to files and allows users to work on different versions of a project simultaneously. Git operates locally on your computer and does not require a network connection to function. It provides commands and tools to create repositories, track changes, create branches, merge changes, and more.
On the other hand, GitHub is a web-based hosting service that provides a centralized platform for Git repositories. It adds additional features and functionality on top of Git. With GitHub, you can store your Git repositories in the cloud, making it easier to collaborate with others. It offers a graphical user interface (GUI) for managing repositories, tracking issues, and facilitating project management. GitHub also provides features like pull requests, code reviews, and continuous integration tools, which help streamline the development workflow.
In summary, Git is the version control system itself, while GitHub is a hosting service built around Git that provides additional features for collaboration, project management, and easier remote access to repositories. However, it's worth noting that there are other Git hosting services available, such as GitLab and Bitbucket, each with their own set of features and offerings.
What does the git push command do?
The Git push command is used to push the content from a local repository to a remote repository. After a local repository has been modified, a push is executed to share the modifications with remote team members.
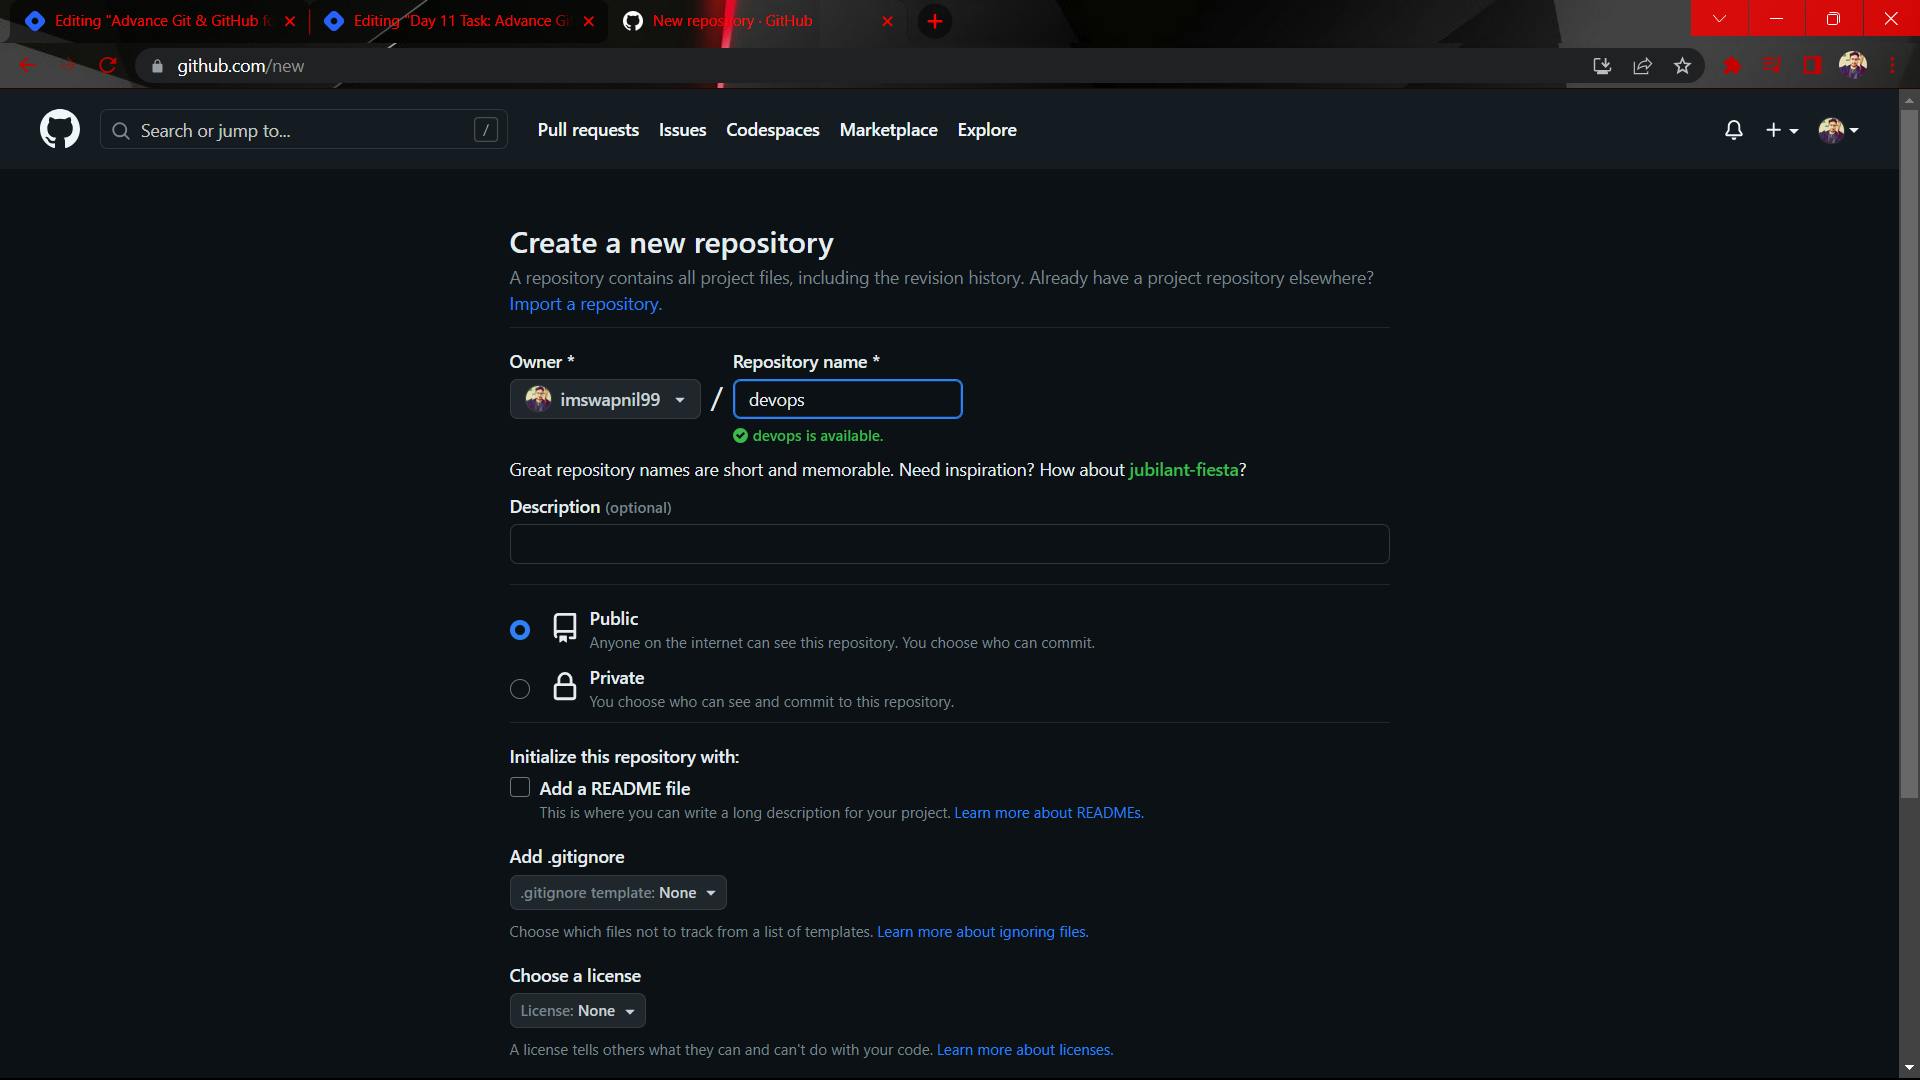
How do you create a new repository on GitHub?
To create a new repository on GitHub, you can follow these steps:
Sign in to your GitHub account. If you don't have an account, you can create one for free at github.com.
Once you're signed in, click on the "+" icon in the top-right corner of the GitHub website. From the dropdown menu, select "New repository."
On the "Create a new repository" page, you'll be prompted to provide some information about your repository:
Repository name: Choose a name for your repository. This should be descriptive and relevant to your project.
Description: Optionally, provide a brief description of your repository.
Public or Private: Select whether you want your repository to be public, accessible to everyone, or private, accessible only to you and the collaborators you invite.
Initialize this repository with a README: If you select this option, GitHub will create an initial README file for your repository. It's helpful to provide some basic information about your project.
.gitignore: You can choose to include a .gitignore file that specifies which files should be ignored by Git when tracking changes.
License: You can choose to include a license file that specifies the permissions and restrictions for your project.
Once you've filled in the desired information, click on the "Create repository" button.
Congratulations! You have successfully created a new repository on GitHub. You can now start adding files, making commits, and collaborating with others by sharing the repository's URL or inviting collaborators to contribute to the project.
What is the difference between local & remote repositories? How to connect local to remote?
Local and remote repositories are two different instances of the same Git repository that are located in different locations.
A local repository is a copy of the repository that resides on your local machine. It contains the entire history of the project, including all files, commits, branches, and tags. You can work on your project, make changes, create new branches, and commit your changes to the local repository.
A remote repository, on the other hand, is a repository that is hosted on a remote server or platform, such as GitHub, GitLab, or Bitbucket. It acts as a central repository where developers can collaborate and share their changes. The remote repository allows multiple people to work on the same project and provides a way to synchronize changes between different local repositories.
To connect your local repository to a remote repository, you need to set up a remote connection. Here's how you can do it:
Create a remote repository: If you haven't already created a remote repository, you can create one on a hosting service like GitHub or GitLab.
Obtain the remote repository URL: Once you have created the remote repository, you will be provided with a URL. Copy the URL of the remote repository.
Open your local repository in a terminal or command prompt.
Add the remote repository: Use the
git remote addcommand to add a remote named "origin" (you can choose a different name if you prefer) and specify the remote repository URL. For example:git remote add origin <remote_repository_url>Verify the remote connection: To verify that the remote has been added successfully, you can use the
git remote -vcommand. It will display the remote repositories associated with your local repository.Push your local commits to the remote repository: To push your local changes to the remote repository, you can use the
git pushcommand. For example, to push the changes in your "main" branch to the "origin" remote repository, you can use:git push origin mainThis will upload your local commits to the remote repository.
From this point on, you can use commands like git pull and git push to synchronize your local repository with the remote repository, allowing you to collaborate with others and share your changes.
Practical:
Task-1:
- Set your user name and email address, which will be associated with your commits.
$ git config --global user.name "Swapnil khairnar"
$ git config --global user.email swapnilkhairnar.78@gmail.com
task-2:
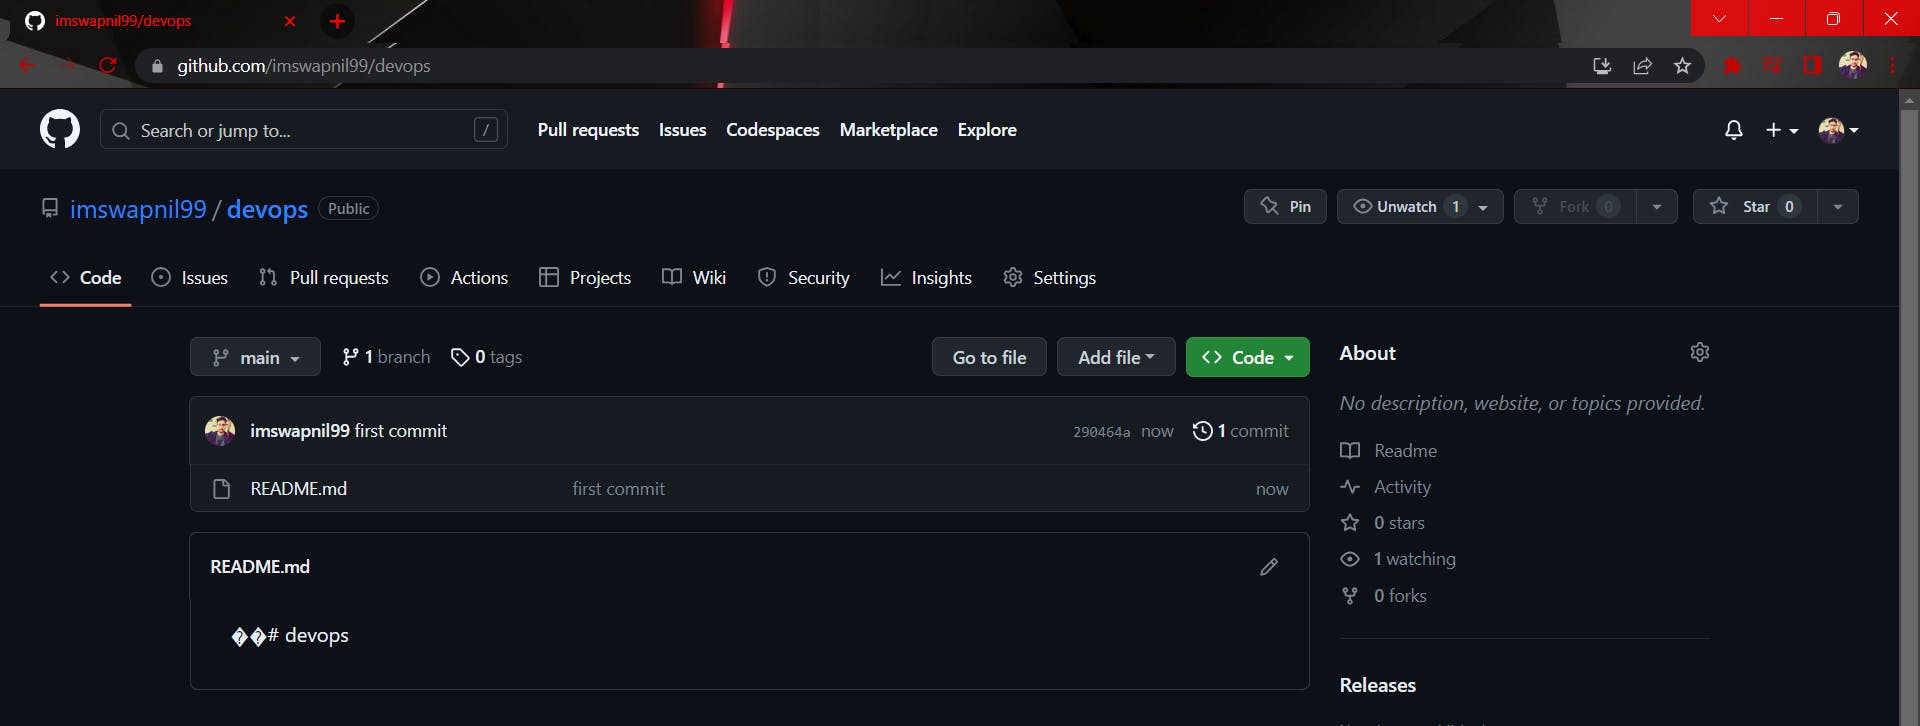
- Create a repository named "Devops" on GitHub
- Connect your local repository to the repository on GitHub.
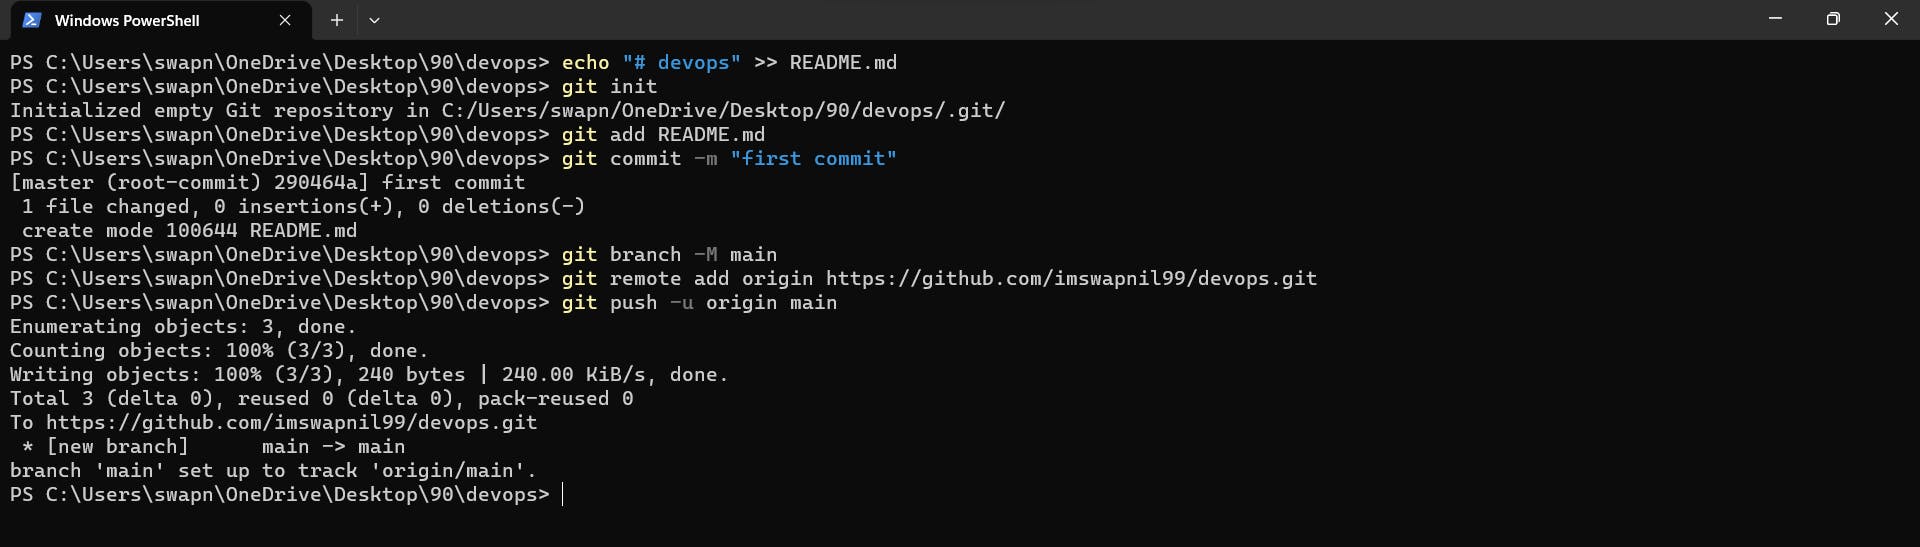
echo "# devops" >> README.md
git init
git add README.md
git commit -m "first commit"
git branch -M main
git remote add origin https://github.com/imswapnil99/devops.git
git push -u origin main
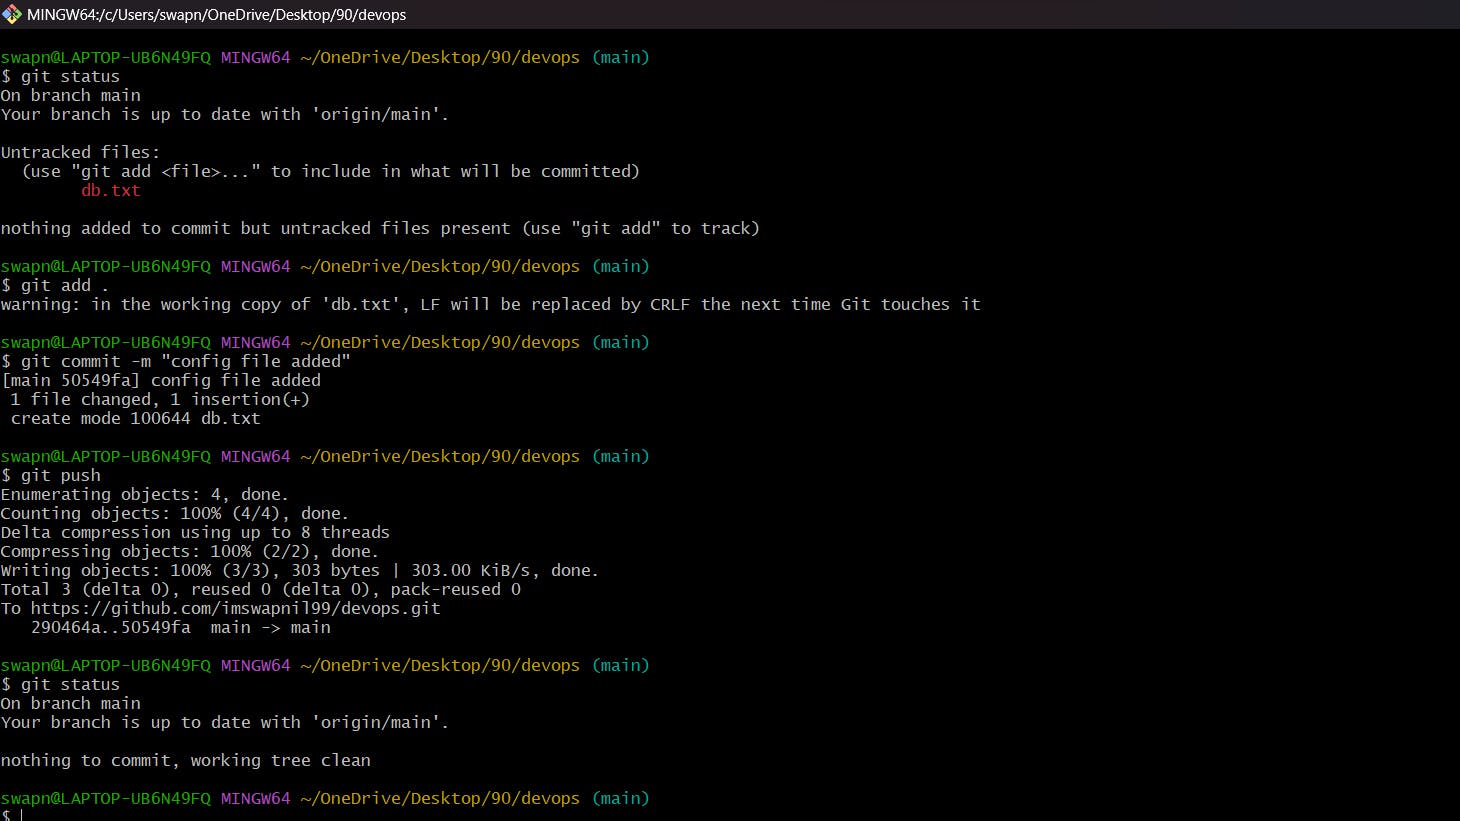
- Create a new file in Devops/db.txt & add some content to it

- Push your local commits to the repository on GitHub

Thanks for reading my article. Have a nice day.

For updates follow me on LinkedIn: Swapnil Khairnar
Hashtags:
#90daysofdevops #devops #cloud #aws #awscloud #awscommunity #docker #linux #kubernetes #k8s #ansible #grafana #terraform #github #opensource #90daysofdevops #challenge #learningprogress #freelancer #linkedin #trainwithshubham #devopscommunity #cloudproviders #bash #bashshellscripting #awkward #shellscripting