

Git Branching
In Git, a branch is a new/separate version of the main repository.
Use a branch to isolate development work without affecting other branches in the repository. Each repository has one default branch and can have multiple other branches. You can merge a branch into another branch using a pull request.
Branches allow you to develop features, fix bugs, or safely experiment with new ideas in a contained area of your repository.
Git is a tool that all Data Scientists and Software Engineers should know how to use. Whether you work on a project alone, or work as part of a large distributed team, understanding how to use Git can save you a lot of time in the long run. This is because git, and version control more broadly, allows you to keep track of changes that are made to code repositories and collaborate effectively with others.
That change that you made that you want to reverse, easily done with git, you want to isolate a new feature from existing code, git, you want a working product running while you make changes, git, you want to work with others on the same piece of code, git and github! It really is magical.
Git Revert and Reset
Two commonly used tools that git users will encounter are git reset and git revert. The benefit of both commands is that you can use them to remove or edit changes you’ve made in the code in previous commits.
Two commonly used tools that git users will encounter are those of git reset and git revert . The benefit of both of these commands is that you can use them to remove or edit changes you’ve made in the code in previous commits. Understanding how both of them work will save you a significant amount of time, allow you to make cleaner code, and have more confidence in making commits when you do.
Reset
At the commit level (where we change whole commits), resetting is a way to move the the current tip of a branch to a previous commit. This can be done to remove commits from the current branch that we no longer want, or to undo any changes that have been made. An example of this is moving the branch new-feature back two commits from the current HEAD using the following command:
git checkout new-feature reset HEAD~2
And which looks like this:

The two commits that were towards the head of the new-feature branch become dangling, or orphaned. This means that they will be deleted the next time that Git performs a garbage collection, essentially removing them from the commit history.
The effect this has however depends on the flags attached to the command:
--softflag means that although we revert back two commits, the changes in those commits remain as part of the working directory and are staged to be committed. If at this point you rungit committhen all the changes that were part of commitsCandBwill be committed and you will be at the same stage as you were before the reset.--mixedis the default flag which is used when no other flag is specified. With this, while the working directory is not changed, meaning that no files are changed, none of these changes are staged to be committed. This means that if you rungit statusyou will see all the files that were changed are in red, waiting to be committed.--hardflag will change both the staged snapshot and the working directory to remove all the changes from commitsBandC. This means you won’t see the changes fromBorCat all and it will be like they never even existed. This is the most extreme reset and means that it will change everything back to how it was after commitA.
This usage of git reset is a simple way to undo changes that haven’t been shared with anyone else. This is because git reset changes the history of the repository and so should only be used when changes have not been made public, such as when pushed to a remote repository. Otherwise, issues can arise that result in merge conflicts when other developers have built on the commits that you change with git reset , which will certainly not make you the most popular developer in your team!
This means that git reset can be used when the commits are mostly on your local repository. Use cases include when new features developed on the current branch should be a part of their own branch, when bugs have been introduced in previous commits and you want to remove them or when you want to change the commit history such as different files in different commits or different names of commits.
Revert
While git reset should mostly be used on non-public branches of repositories there are times when you want to undo a change that has been made to a public repository. This could be because the changes made introduced an unexpected bug or the change itself wasn’t needed. In this scenario, git revert should be used instead of git reset .
This is because reverting undoes a commit by creating a new one. This makes it a safe way for undoing changes in a public commit history as it does not overwrite any of that history, rather it just undoes all of those changes in a new commit. An example of this is when you want to undo the changes made in commit B , you can use git revert B to create a new commit that undoes all of those changes. In doing so, git figures out the changes that were made in B , undoes all of those changes if possible, and then will add a new commit onto the existing project as follows:
git revert B
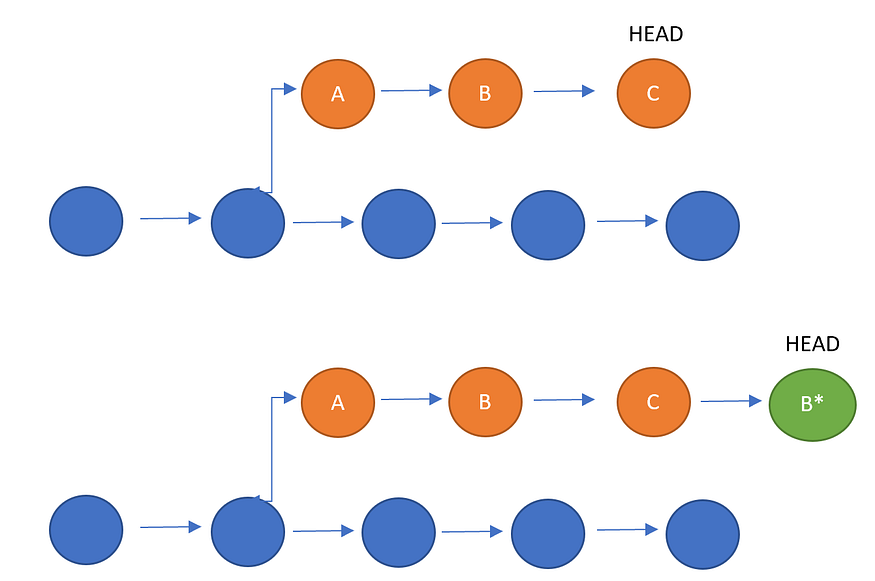
If the changes can be made, and there are no merge conflicts, then an editor will open up asking you to name the new commit which will be added to the end of the current head, as with B* .
This preserves the commit history and potentially reduces the amount of merge conflicts that your team may have to deal with. Before you do this though, since git revert has the potential to overwrite files, you will need to commit or stash the changes that would otherwise be lost during the revert operations
Conclusions
git reset and git revert are both useful commands for undoing changes that have been made in previous commits. While git reset does this by moving the current head of the branch back to the specified commit, thereby changing the commit history, git revert does this by creating a new commit that undoes the changes in the specified commit and so does not change the history. This means that when you want to undo the changes in multiple commits, git reset may be more useful but should mostly be used only when changes have not been made public, while git revert can be used when only a specific commit needs to be undone and can be used even when the changes have been made public. Knowing how to use these two commands should give you more confidence when making commits, as you know they can be undone, and hopefully make you and your team more productive!
Git Rebase and Merge

Git Rebase and Git Merge are both Git commands used to integrate changes from one branch into another, but they have different approaches and effects on the commit history.
Git Rebase: The
git rebasethe command is used to incorporate changes from one branch onto another branch by applying each commit on the source branch to the target branch. It essentially moves or reapplies a sequence of commits onto a different base commit.Usage:
git rebase <branch>The
<branch>the parameter represents the branch that you want to apply your changes onto.Example:
git rebase mainThis command will take the commits from the current branch and reapply them on top of the
mainbranch.Advantages:
Linear history: Rebase allows you to create a linear commit history by incorporating the changes from one branch onto another.
Cleaner history: It avoids unnecessary merge commits, resulting in a cleaner commit history.
Disadvantages:
History modification: Rebase rewrites the commit history by creating new commits with different parent commits. This can cause problems if the rebased commits have been pushed to a shared repository and others are working on the same branch.
Potential conflicts: Rebasing can introduce conflicts when applying the changes from one branch onto another. These conflicts need to be resolved manually.
Git Merge: The
git mergecommand is used to combine changes from one branch into another branch by creating a new commit that incorporates the changes from both branches. It creates a merge commit that represents the integration of the changes.Usage:
git merge <branch>The
<branch>parameter represents the branch from which you want to merge the changes.Example:
git merge featureThis command will merge the changes from the
featurebranch into the current branch.Advantages:
Preserves history: Merge commits preserve the entire history of both branches, clearly showing where the integration of changes occurred.
Automatic conflict resolution: Git automatically resolves simple merging conflicts during a merge operation. Complex conflicts may still require manual resolution.
Disadvantages:
Cluttered history: Merge commits can create a more cluttered commit history, especially if there are frequent merges between branches.
Non-linear history: Merging introduces additional commit(s) to represent the integration, which can result in a non-linear commit history.
The choice between git rebase and git merge depends on your workflow and the goals of your Git repository. Use git rebase if you want a cleaner, linear commit history, and use git merge if you want to preserve the entire history of both branches.
Practical:
Task 1:
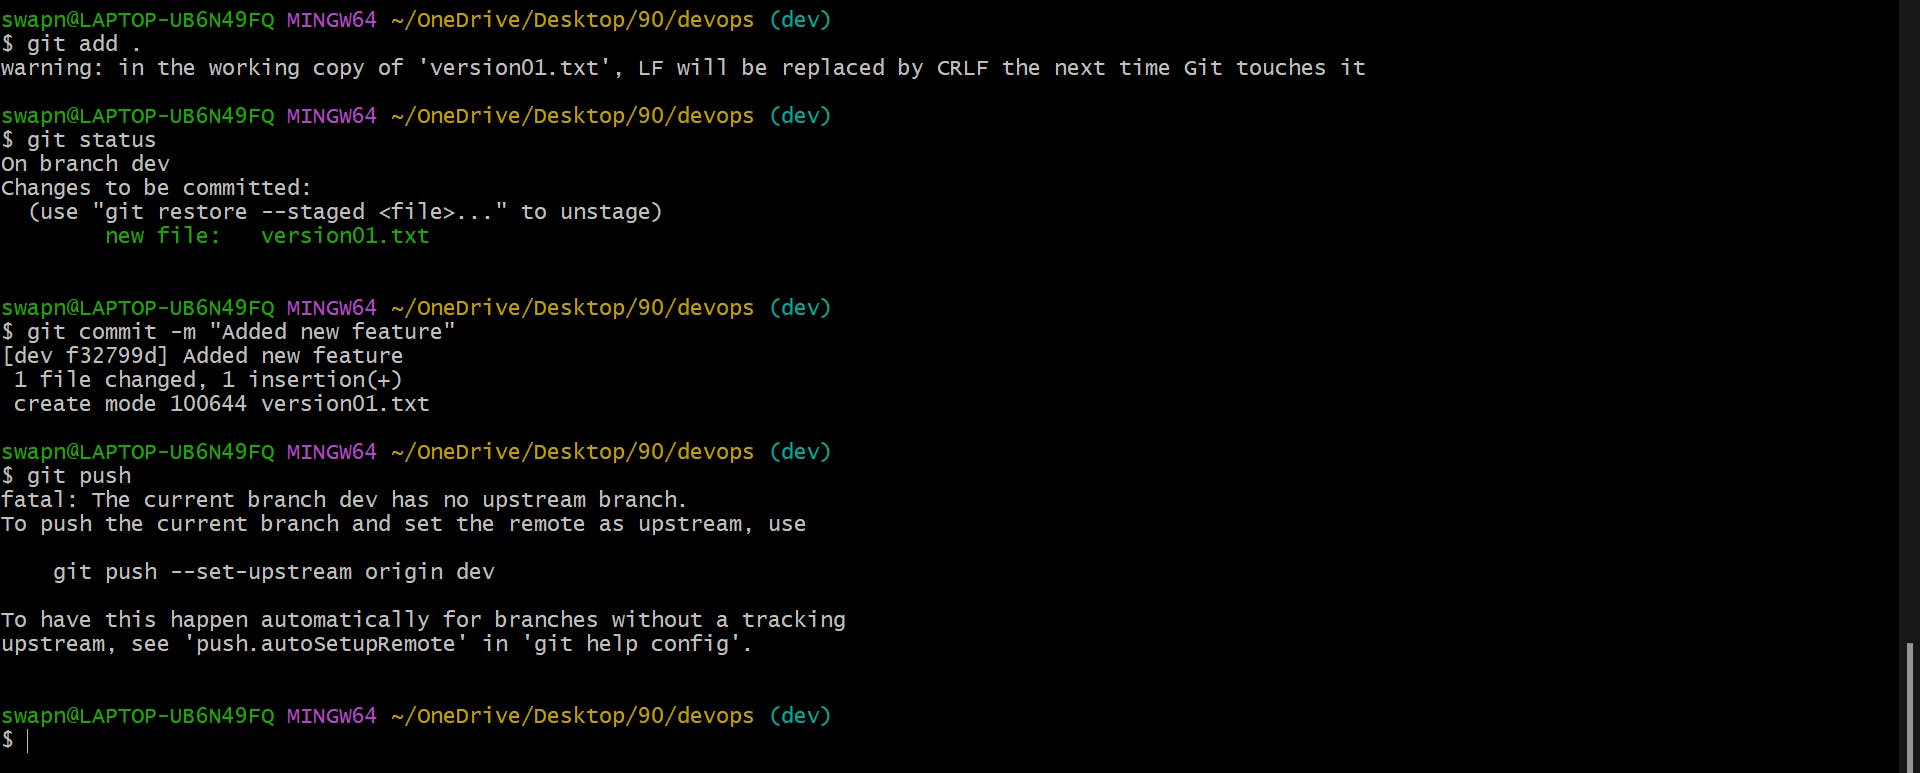
Add a text file called version01.txt inside the Devops/Git/ with “This is first feature of our application” written inside. This should be in a branch coming from master, [hint try git checkout -b dev], switch to dev branch ( Make sure your commit message will reflect as "Added new feature").
- version01.txt should reflect at local repo first followed by Remote repo for review.
git checkout -b dev

echo "This is the first feature of our application" > version01.txt

git add .

git status
git commit -m "Added new feature"
git push
Add a new commit in dev branch after adding the below-mentioned content in Devops/Git/version01.txt: While writing the file make sure you write these lines
1st line>> This is the bug fix in the development branch
Commit this with the message “ Added feature2 in development branch”
2nd line>> This is gadbad code
Commit this with the message “ Added feature3 in the development branch
3rd line>> This feature will gadbad everything from now.
Commit with the message “ Added feature4 in the development branch
vim version01.txt
# added line > This is the bug fix in development branch
git add version01.txt
git commit -m "Added feature2 in development branch"
cat version01.txt
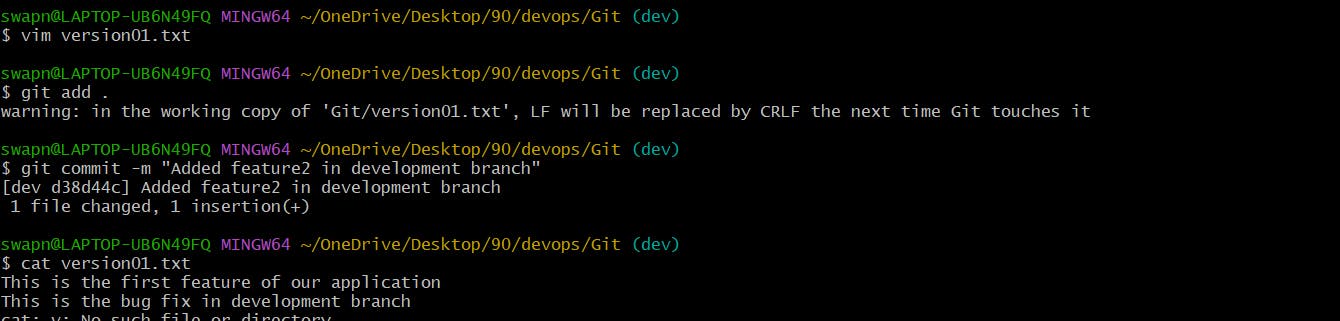
git log --oneline

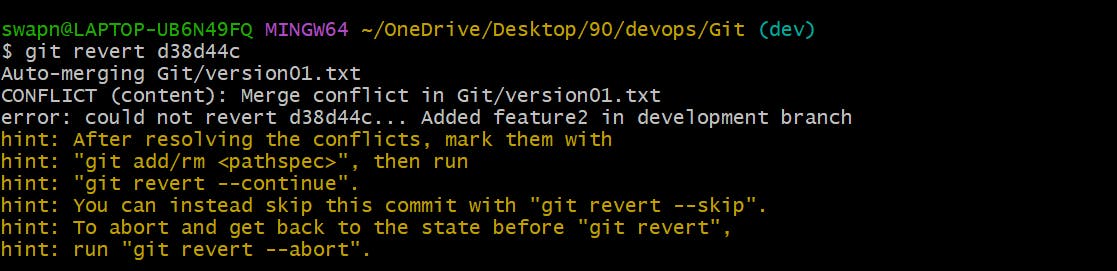
Restore the file to a previous version where the content should be “This is the bug fix in the development branch” [Hint use git revert or reset according to your knowledge]
Let's revert to d38d44c -
git revert 6db60b5
vim version01.txt
# Removed Changes
git add .
git commit -m "This is the bug fix in development branch"

cat version01.txt

git log --online

git diff bd3c 83fd

Thanks for reading my article. Have a nice day.

For updates follow me on LinkedIn: Swapnil Khairnar
Hashtags:
#90daysofdevops #devops #cloud #aws #awscloud #awscommunity #docker #linux #kubernetes #k8s #ansible #grafana #terraform #github #opensource #90daysofdevops #challenge #learningprogress #freelancer #linkedin #trainwithshubham #devopscommunity #cloudproviders #bash #bashshellscripting #awkward #shellscripting